Wednesday, June 24, 2009

Nocino!


Ah the much coveted Nocino. I first tried making this last year with some moderate success. Most of the recipes I've seen recommend waiting a full year after the bottling of the liquor before it's imbibed. Needless to say, I did not wait a year by any means and consumed a batch within the first 6 - 8 months (with the help of some friends that were willing to aid in my experiment heh) - It was good, but I plan on practicing patience this time.

I would consider my first attempt a moderate success. I definitely need to practice patience this go around, and also want to tweak some of the ingredients as well. The original recipe I cultivated from other websites/ an italian family's recipe contained pure grain alcohol, cinnamon sticks, cloves, a small branch of juniper and lemon peel. As far as flavor profiles go, I think this round will take advantage of the cinnamon sticks, but I'll use orange peel, vanilla, and some star anise to create a mellower, hopefully more balanced flavor to play off the bitter sweetness the walnuts provide.

As far as alcohol goes, I've found as many recipes that use vodka as ones that use pure grain alcohol. The difference seems to be that, after the Nocino has sat, the recipes made with vodka don't have to be watered down. The watering down process would add the over all volume. So, since I have the walnuts, I'll do two batches this year. The variable between them will be the use of anise seed (whole star anise being difficult to find around here).

Nocino

1 liter Vodka
2 1/2 cups sugar
1 orange peel
1/2 vanilla bean
1 tsp anise seed
25 green walnuts, rinsed and quartered

Combine the ingredients in a glass jar that can be sealed and let it sit until the Autumn equinox/end of August/beginning of September (I've found recipes swearing by all three). At this time drain the Nocino through cheesecloth or a coffee filter into bottles. This makes one batch, I double it, so by the end I should have about 3 bottles of Nocino. It should be ready about a year after bottling, although, if the past has been any indication, it's perfectly safe to drink sooner than that ;-)


Funny story; keep the walnuts, peels and everything else in the jar after you've bottled the Nocino and pour over a bottle of Marsala wine - after ten days re-bottle the marsala and keep it chilled for a delightful apperetif (at least it worked spendidly last time. I'll update when the time comes.

Tomorrow I leave for France, so posting this summer will likely be non-existent, but do intend on keeping some kind of food log with me for the many delicacies I will enjoy.

Tuesday, June 23, 2009

Blueberry Shortcakes

Sugar Free Blueberry Shortcakes

*This was adapted from a recipe I found in a recent Bon Apetit and is likely over at Epicurious

Delicious Blueberry Sauce:
4 cups blueberries, fresh or thawed and rinsed if frozen
2 tbsp splenda brown sugar
1/4 cup splenda granular


Lemon Thyme Biscuits:

3/4 cup chilled buttermilk
1 tablespoon finely grated lemon peel
1 teaspoon chopped fresh thyme
1 1/4 cups brown rice flour
1 cup whole wheat flour
1 tbsp Splenda brown sugar + 1/4 cup Splenda granular
1 1/2 teaspoons baking powder
1 teaspoon baking soda
1/4 teaspoon salt
6 tablespoons (3/4 stick) chilled unsalted butter, cut into 1/3-inch cubes

*The primary alterations were in the sugar and the flour departments - the combination of brown rice and whole wheat flours produces a very tender crumb and I feel it's much healthier than regular all-purpose flour - I should try these at some point with only brown rice flour*

Mix the buttermilk, thyme, and lemon zest together in a small bowl. If you don't have buttermilk it's easy to make some by adding roughly a tbsp of lemon juice or vinegar to a cup of milk. For this recipe, for this amount, I just estimate about 3/4 of a tbsp for the 3/4 cup milk.

In a separate bowl, whisk to combine the flours, Splenda, baking powder, baking soda, and salt. Rub the butter into the flour mixture with your fingertips or a pastry blender. When the mixture resembles coarse meal/small pea-sized dough pieces/grated parmesan cheese. every other cliche for what this mixture looks like add the buttermilk. Combine the dough with a fork. It will be sticky, and you should handle it as little as possible.

Empty the dough out onto a lightly floured surface and pat it into a rectangle. Kneading shouldn't be necessary, and is not recommended to make a tender dough, but you may have to press the dough together. Cut the rectangle once down the middle and twice down the long side to make 6 small rectangles. Put these on a baking sheet and into a 425 degree oven for about 12 - 15 minutes or until they pass the toothpick test. They should be lightly brown around the edges.


Split these guys wide open and fill with sugar free vanilla ice cream* and the blue berry sauce for one heck of a sugar-free dessert. I served these on Father's Day and they were definitely a hit.


*Sugar free whipped cream could also work, but I was lazy and the ice-cream is less fattening :-)

Sunday, June 21, 2009

Yogurt Cheese

This does not sound terribly appetizing. Granted if you adorn any word with 'cheese' it can kinda make it sound disgusting. However, yogurt cheese is just yogurt that has been drained over night. I place a large container of plain yogurt in a sieve lined with cheese cloth (or a paper towel can work as well) over a bowl, and I let it set overnight in the refrigerator. What you have is incredibly thick, almost cream-cheese-thick, yogurt and the whey that's been drained off.


I've been told you can consume whey (in about a 1 tbsp per glass of water ratio) to help with digestion. I think it used to be a kind of panacea for stomach ailments. Either way, the product I'm interested in is the thick yogurt cheese left over. At 8 grams of fat per 1 cup, yogurt definitely beats cream cheese and condiments like mayonnaise, but the consistency is typically too thin.

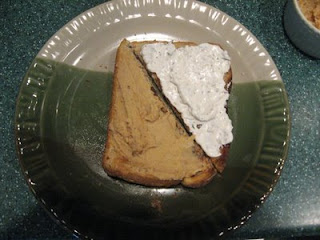
I used this yogurt cheese to create two spreads that both worked great on bagels as a healthier alternative to cream cheese. For the first spread I combined equal parts yogurt cheese and peanut butter. This provided a subtle tanginess and a profound creaminess to usually heavy peanut butter.

The second spread I tried consisted of a little chopped onion, a crushed clove of garlic, a little thyme I had laying around, and some salt and pepper. Here I was going for a kind of garlic and herb cream cheese substitute. Because of the inherent lightness of the yogurt, the extra flavors were definitely profound. I loved it, but I can see how it might be too garlicky or too onion-y for some people.


I ended up using the remaining yogurt cheese as a way to lighten up some tuna salad (combined with a little mayo, salt and pepper, and red wine vinegar) and to add some creaminess to an otherwise heavy broccoli casserole (I have my mom to thank for that suggestion). I definitely want to experiment more with this next year...

*I wish I had bagels, but toast works as well

Friday, June 12, 2009

Plans before France

So while I'm at home I have a few very specific plans and things I'd like to accomplish before I leave for France:

Make yogurt cheese. Do stuff with this, report back.

Make a sugar free lemon cake with glaze.

Make Nocino... my recipe to come :-)

Practice my carrot noodles and, in general, asian food.

I will update a few times, hopefully, before I leave.

:D

Tuesday, June 2, 2009

It's that time of quarter again

Well, we're approaching the end of the quarter so I'm not sure exactly how much cooking I'll be able to get done. Finals are due next Monday and Tuesday, so hopefully I'll have some time to have fun before I move home. I should be able to cook there as well before I leave for France for the summer.

That of course will mean about a two month break from blogging and cooking in favor of playing with kids all day long.

I'm pretty sure I'll have time this weekend to whip something up though (one potluck final on Monday will supply, if nothing else, a little motivation).

Until then, the times, they be crazy