Tuesday, November 26, 2013

Volumetric Macarons

Throughout the 7 batches of macarons I made to try to figure out this treat, I discovered that one of the biggest challenges was interpreting all of the macaron recipes out there. I worked with a chef once who came into our restaurant with an extensive culinary education and background. The baker on staff, not classically trained, challenged him to make this yellow lemon and orange cake the restaurant was known for. The chef looked over the baker's convoluted notes taken from years of trying to perfect this elusive recipe and realized what it was. After successfully making it on the first try, he remarked to me: "I looked over [the baker's] notes; it was just a basic chiffon cake. I'm not sure why [the baker] thought it was so complicated."

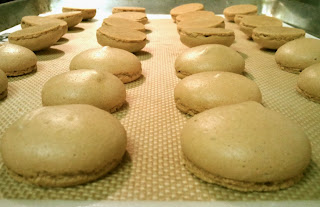
Macarons are kind of like that. Yes, it did take me many attempts to get the technique down, but at the end of the day, it's nothing more than making a stiff meringue, deflating it by folding in a sugar/almond flour mixture, and baking it on a lower-than-average temperature to encourage the meringue to rise slightly. Give macarons a try; they really aren't that hard.


I've seen so many posts about French Macarons, and they all involve tutorials, precautions, extra steps, weight measurements, and much more, but my attempts were a bit different. First, I used a volumetric recipe for ease. After getting used to the amounts, the process became more about the technique of folding the meringue than aging my egg whites, weighing each ingredient precisely, or anything else. Before I go into more detail, here were two incredibly helpful guides I found:

I stumbled across this helpful video tutorial from Entertaining with Beth, and it really gave me a good idea of what the macaron batter should look like.

This troubleshooting guide from Food Nouveau helped me to figure out where I was going wrong when my macarons, for example, came out of the oven with hollow, cracked shells.

In short, there are a few steps that are necessary to master and/or gave me particular trouble. Honestly though, it just took a lot of practice (seven - eight batches, to be precise):
  • Whipping eggwhites to soft peaks, adding superfine sugar, and continuing to beat until stiff peaks form (and knowing the difference between soft, medium, and stiff peaks).
  • Folding almond flour and confectioner's sugar into the meringue and deflating it enough to create an oozey, lava-like batter without it becoming too thin.
  • Baking the macarons properly is also important. My oven overheats, so while many recipes have you bake the macarons at 325 degrees F, I bake mine at 305 degrees, and I used two baking sheets stacked on one another.

French Macarons

3/4 cup ground almonds or almond meal
1 cup confectioner's sugar

2 extra large egg whites, room temperature
1/4 cup superfine sugar

gel-based food dye
flavoring (optional: 1/2-1 tsp vanilla, almond, or peppermint extracts or citrus zest)

Prepare two baking sheets by lining them with parchment paper. Prep a pastry bag with a wide, round tip.

Place ground almonds in the bowl of a food processor and process for 30 seconds. Add the powdered sugar and process for 30 seconds - 1 minute. Stir the mixture to loosen and process for an additional minute to ensure mixture is finely ground, almost powdery. Sift this powder into a separate bowl and discard any left over solids.

In the bowl of an electric mixer, beat the egg whites until they hold a soft peak. With the mixer running, gradually add the superfine sugar until a thick, glossy, stiff meringue is formed. I usually allow a minute to incorporate the sugar and it typically takes at least a couple more minutes for the meringue to stiffen. At this stage, add in any dyes or flavorings.

Using a spatula, fold the almond mixture into the meringue in two additions. When all of the dry ingredients are incorporated, stir gently until the mixture is shiny and falls back on itself in thick, again lava-like, ribbons.

Pour the batter into the prepared pastry bag and pipe into mounds of equal size on the parchment paper. I eye-balled the size, but aimed for quarter-to-half-dollar-sized rounds. Tap the baking sheets on the counter to remove any air bubbles. Let these sit at room temperature for 20 - 40 minutes. The goal is to form a tacky skin on top of the macaron. You should be able to touch the top lightly without it being sticky.

Preheat the oven to 305 degrees F. Bake macarons for 15 - 20 minutes. Touch the tops of the macaron to test: they should be solid cookies and should not wriggle on their "feet." While you can immediately remove the parchment from the baking sheet, cool the macarons completely before removing them from the parchment.


Now comes the fun part that doesn't involve any craziness: the filling. As a general rule, because the macarons are so sweet, I prefer tart/strong-flavored fillings. A good chocolate ganache filling, for example...

Chocolate Ganache

4oz chocolate, chopped
1/4 cup heavy cream
1/2 - 1 tbsp flavoring (amaretto, vanilla, coffee liqeuer, etc)

Combine ingredients in a glass bowl set over a medium pot of simmering water. Stir until the chocolate melts, and let it cool for 10 minutes before filling macarons.

Friday, November 15, 2013

Carrot Cake Cookies

While this recipe looks similar to my other cookie recipes, the shredded carrot really makes a big difference in the batter: the added moisture provides a cake-like consistency even though the cookie is still chewy. The spice combination of cinnamon, ginger, and cardamom is perhaps my favorite blend for use in all things carrot cake.


Carrot Cake Cookies

2 1/4 cups all-purpose flour (bread flour works really well too)
1/2 tsp baking soda
1/2 tsp salt
2 tsp cinnamon
1 tsp ginger
1/2 tsp cardamom
1 tsp cornstarch

3/4 cups butter
1 cup sugar
1/2 cup dark brown sugar
1 egg + 1 egg yolk
1 tbsp vanilla

1 cup carrots, finely shredded (and measured after having been shredded)

In a medium pan over medium-high heat, brown the butter. See my Apple Pie Cookie post for a brief tutorial on browning butter if this is new for you. Pour the browned butter into the bowl of a stand mixer and let it cool.

Meanwhile, whisk together dry ingredients and finely shred the carrots (2 medium carrots should make the 1 cup required).

Cream melted butter with sugars until a homogenous, sandy mixture is formed. Add the egg, egg yolk, and vanilla. Mix until creamy, about half a minute at medium speed. Add dry ingredients to batter gradually, with the mixer running on low speed. Finally, mix in the chopped carrot. Chill dough for at least an hour and up to 2 days.

Scoop dough (or roll dough into balls) and place on a baking sheet. I used roughly 1/4 cup of dough to make large cookies. Bake at 325 for 15-17 minutes or until browned around the edges but still puffy in the center.

Cream Cheese Frosting

4 oz cream cheese, softened
2 tbsp cream
1 tsp vanilla
1 cup confectioner's sugar

Combine the soft cream cheese with the cream and vanilla, and stir until smooth. Add in the confectioner's sugar gradually, until frosting consistency is achieved. Add cream, if necessary, to attain desired consistency (I actually started off calling this a "glaze," but it turns out I prefer it a bit thicker).

Pecans

1/2 cup pecans
1/2 tbsp melted butter
1/2 tsp salt

Chop and toss pecans with butter and salt. Toast pecans in a 350 degree oven until browned and fragrant, about 10-15 minutes.

Spread cream cheese frosting on cookies. Top with pecans. Enjoy your carrot cake in cookie form.


While other recipes took a couple tries to get right (and in some cases still aren't quite perfect), these cookies came out perfect the first time. The only changes I made were using the toasted pecans on top rather than in the cookies.


Wednesday, November 13, 2013

Apple Pie Cookies

Apple Pie in cookie form. What more could anybody want in the fall?


Apple Fritter Cookies
yield: about 12 - 16 large cookies

3/4 cup butter
1 cup dark brown sugar
1/2 cup white sugar
1 egg + 1 egg yolk
1 tbsp apple liqueur (optional)

2 cups all-purpose flour
2 tsp ground cinnamon
1/4 tsp each, cloves and nutmeg (optional)
1/2 tsp baking soda
1/2 tsp salt
1 tsp cornstarch

1 1/2 cups dehydrated apple slices, lightly packed

1/2 cup packed dark brown sugar
1/4 cup sugar
1 tsp cinnamon

In a sauce pan over medium heat, melt the butter. Increase the heat to medium high and stir with a silicone spatula. Keeping the butter constantly moving promotes even browning of the milk solids for a more consistent final product. Additionally, the stirring prevents the milk solids from sticking to the bottom of your pan. From melting to browning takes about 5-10 minutes, based on heat. The butter can go from brown to burnt easily, so stir constantly.

Pour the browned butter into the bowl of a stand mixer and let it cool slightly.

Meanwhile, whisk together dry ingredients to combine. Additionally, pulse dehydrated apple slices in food processor or chop them by hand so that you're left with tiny and medium-sized bits of dried apple (dime-sized or smaller).

Add the sugars to the cooled browned butter, mixing at medium speed until a homogenous, sandy mixture forms. Add eggs and liqueur, if using. Mix until creamy and smooth, about half a minute on medium speed.

With the mixer on low, add the dry ingredients gradually, scraping down the bowl as needed. Finally, mix in the chopped apple. Chill dough for at least an hour (though it can stay refrigerated for up to 2 days).

Before baking, set the dough out of the refrigerator so it's easier to scoop (about an hour should do). Combine the granulated sugar, brown sugar, and cinnamon in a bowl. Portion the dough into balls (it's too stiff to "drop" onto a baking sheet). Roll and flatten the dough between your hands. Press one side of the cookie into the cinnamon sugar mixture, ensuring that it adheres. Roll the sides of the cookie in the mixture as well. Place the dough on a baking sheet and bake at 325 for 13-15 minutes. The edges should just barely  brown and the center slightly puffed. Under-baking is better than over-baking these cookies. Cool on the cookie sheets for 5 minutes before transferring to a wire rack to cool completely. Enjoy the taste of fall.


These cookies are fantastic. That is the wholesale truth. They are like an apple pie or apple fritter but in cookie form. The final step, rolling the cookies in cinnamon-sugar, isn't necessary, but the results are definitely pleasing. I could not be happier with these cookies. The only secret behind them is that they started out as Apple Sage Cookies. That flavor combination was tasty, but it wasn't at home in the form of a cookie. Apple Pie, on the other hand, has worked wonderfully.

Saturday, November 9, 2013

Cherry Goat Cheese Cookies


That's right: Cherry Goat Cheese Cookies. Don't freak out. They'll be just fine.

Cherry Cookies

3/4 cup unsalted butter

2 cups bread flour
1/2 baking soda
1/2 salt
1 tsp cornstarch

1/2 cup dark brown sugar
1 cup granulated sugar
2 tbsp cherry preserves
1 egg + 1 egg yolk
1 tsp almond extract

1 cup dried cherries, slightly rehydrated in a bit of bourbon, if you like

In a sauce pan over medium high heat, melt the butter until it stops foaming (however, do not let it brown). Let cool.

Meanwhile, whisk together the dry ingredients.

Mix the butter, sugars, and preserves together until homogenous. Add the egg, egg yolk, and almond extract and cream on medium speed for 1 minute or until creamy. With the mixer on low, gradually add the dry ingredients. Finally, stir in the cherries. Chill dough for at least an hour. Drop by the quarter cup onto a baking sheet and bake at 325 for 15-17 until just beginning to brown around the edges.

Goat Cheese Glaze

2oz goat cheese
2 tbsp cream
1/2 tsp vanilla
1/2 confectioner's sugar

Using a whisk, combine the goat cheese and 1 tbsp of cream to make a loose, smooth mixture. Add in the confectioner's sugar. If the frosting is too stiff, add a little more cream. I kept mine the consistency of a thick glaze. Spread on the warm cookies allowing for it to completely cover them. Cool completely, allowing the glaze to stiffen.


When I eat goat cheese and cherry preserves, a wonderful alchemy of flavors happens: the tanginess of the goat cheese mirrors the slight tartness of the cherry, and the sweetness of the jam complements the earthiness of the cheese. That combination of flavors, but in the form of a cookie, was my goal. These cookies, in all honesty, do not mimic that affect. However, they are still incredibly tasty in their own right. Rather than cherry goat cheese cookies, these are more like cherry pop-tart cookies, which is a different kind of alchemy altogether.

Sunday, November 3, 2013

Well, it has been quite a while...

I need a new place online to post things. And I need a place to let out my creativity and log some of my successful cooking ventures. I don't know if this is that place, but I've had a lot of great things that I definitely need to write about...


First up is a coconut cake experiment. At work, we're having a halloween treat decorating contest. This would be, to date, only the second food-based contest I've ever entered. 

And I want to win.

Considering my work place, I want the treat to be haunting and creepy without going too overboard. It's a somewhat conservative working environment, and, at any rate, my personal aesthetic is somewhere along the lines of "less is more."

So here's my idea: Coconut cake. Personally, I like Ina Garten's, Barefoot Contessa's recipe because it's easy to make and incredibly delicious. However, I've never been fond of the cream cheese frosting accompanying it. In fact, Martha Stewarts fluffy egg-white frosting rolled in coconut is a perfect addition to Garten's cake. Neither of these will work here for decorating purposes. So let me break my idea down for you:
  • Garten's 2-layer, 9" round cake, split into 4 thinner layers.
  • Each layer is sandwiched with a stiffened coconut whipped cream filling.
  • Traditional, American buttercream frosts the outside of the cake allowing for a clean slate in terms of decorations.
Ultimately, this will allow a smooth, clean, white surface for my decorations: simple dots of frosting around the base, scattered sugar pearls on top, and blood splattered glass candy stabbed gloriously into the cake (with a little extra blood splatter for good measure).

Overview of Project:
  • First, bake the coconut cake.
  • As the cake cools, make the glass shard decorations.
  • Once the cake is completely cool, make the filling and stack the cake, keeping it refrigerated.
  • Make the frosting and frost the top and sides of the cake.
  • Decorate the cake using the shards and food coloring.
Coconut Cake
I'm pretty much using the Barefoot Contessa's cake and recipe, word for word. It's perfect.

1 1/2 cups (3 sticks) unsalted butter, at room temperature, plus more for greasing the pans
2 cups sugar

3 cups all-purpose flour, plus more for dusting the cake pans
1 tsp baking powder
1/2 tsp baking soda
1/2 tsp salt

5 extra-large eggs, at room temperature
1 1/2 tsp almond extract
1 1/2 tsp vanilla extract

1 cup milk (use coconut milk if you like)
4 oz sweetened, shredded coconut

Preheat oven to 350 degrees F. Butter two 9-inch round cake pans, line the bottoms with parchment paper, then butter and flour the bottom and sides of the pans.

In a large bowl, sift together the flour, baking powder, baking soda, and salt. Set aside.

In the bowl of an electric mixer fitted with a paddle attachment, cream the butter and sugar on medium-high speed for 3-5 minutes, until light yellow and fluffy. Crack the eggs into a small bowl. With the mixer on medium speed, add the eggs, 1 at a time, scraping down the bowl as needed. Add the vanilla and almond extracts and mix well. 

With the mixer on low speed, add the dry ingredients alternately with the milk or coconut milk. Begin and end with the dry ingredients in 3 parts and the milk in 2 parts. Mix just until combined. Fold in the 4 oz of coconut.

Pour the batter evenly into the two pans and smooth the top. Bake in the center of the preheated oven for 45-55 minutes, until the tops are browned and a cake tester comes out clean. Cool on a baking rack for 30 minutes. Turn the cakes our onto a baking rack to finish cooling. 

Once cool, carefully slice each layer in half to have 4 layers of cake.

Coconut Whipped Cream Filling
3 tbsp cold water
1 3/4 tsp unflavored gelatin
2 1/4 cups heavy whipping cream, divided
1/2 cup powdered sugar
1 tsp vanilla
1 1/2 cups sweetened shredded coconut

Place water in a small bowl and sprinkle the gelatin over. Let stand until the gelatin softens, about 10 minutes. Bring 1/2 cup cream just to a simmer (either on the stove or in the microwave). Pour hot cream over gelatin; stir until gelatin dissolves. Place in refrigerator until cool, but not set, stirring frequently, 5 - 8 minutes.

Beat remaining 1 3/4 cups cream, powdered sugar, and vanilla in medium bowl until peaks form. Gradually add cooled gelatin, beating until medium-firm peaks form. Be careful not to over beat or it will deflate. Fold in coconut.

American Buttercream Frosting
1 cup salted butter, softened
4 cups confectioner's sugar
1 tbsp vanilla
4-5 tbsp heavy cream

In the bowl of a stand mixer fitted with a paddle attachment, beat the butter until light and creamy, about 3-5 minutes. Next, beat in the confectioner's sugar, one cup at a time, beating completely until all four cups are incorporated. Mix in the vanilla followed by the cream. Add in the cream one tablespoonful at a time until it reaches the consistency you're looking for. Personally, I mixed in four tablespoons.

Halloween Glass Shards
Originally posted at Sweet Explorations, a wonderful website filled with fun decorating tutorials.

1 cup sugar
1/2 cup light corn syrup

Food coloring (either liquid or paste)

First, prepare a baking sheet by lining it with parchment paper. Then, in a microwave-safe bowl or measuring cup, combine the sugar and corn syrup to make a sugar quicksand of sorts. Microwave on high for 3 minutes. 

There are circles of Hell that are cooler than this mixture, so please be very careful as you remove it and stir to make sure all of the sugar is dissolved. Place back in the microwave and cook on high for 2-3 minutes more. 

Check the temperature using a candy thermometer after 2 minutes to be safe. The variation is based solely on the power of your microwave. My 1000 watt microwave hits the sweet spot of 178-ish degrees right at 2 minutes.

Pour the hot mixture onto the parchment paper, rocking the pan back and forth to spread out the faux glass. Let it cool completely. Shatter the resulting sugar glass into shards. When ready to use, dip the shards, upside down, into food coloring (or food coloring paste mixed with a little water), turn right side up and place into the cake. 

Assembly

Place one layer of the coconut cake on a cake board. Spread 1/3 of the coconut whipped cream on the cake. Repeat with remaining layers until you top with the final layer of cake. Chill until the filling is set, about 2 hours. 

Alternately, I've had good luck filling and chilling gradually as I build the cake, ensuring the filling doesn't squish out the sides and reducing the overall chilling time.

Frost the top and sides of the cake with the buttercream frosting.


Finally add the bloodied glass shards and extra faux blood for good measure. And, of course, enjoy your masterpiece! I wound up getting second place in favor of some skeleton cupcakes made with chocolate covered pretzels and marshmallows. However, the taste was amazing, and I will definitely be making this cake, sans bloody glass shards, many times for my coconut-loving friends.